Building Knowledge
Joint taping tips and techniques for a seamless drywall finish
Employ these best practices when applying drywall paper tape to create seamless joints and a smooth wall surface

Achieving the desired drywall finish — from Level 0 to Level 5 — starts with the right materials and techniques. For any interior space that requires a Level 1 finish or higher, drywall paper tape and joint compound work together to form the first defense in concealing and reinforcing wallboard joints and interior angles. As a result, a firm understanding of how to apply paper joint tape is paramount, ensuring a solid foundation for additional joint compound layers to achieve the right finish level.
Manufactured by ProForm Finishing Products, LLC, an affiliate of National Gypsum Company, ProForm® Paper Joint Tape is a reliable choice for reinforcing seams and preventing cracks, ensuring a professional-quality result.
This blog post will highlight the differences between paper and mesh tape, explain how to use paper joint tape effectively and provide troubleshooting tips to overcome common challenges.
Paper tape vs. Mesh tape
Paper and mesh tape are the two main options for drywall taping, each with benefits and ideal applications. Knowing the difference between each type and when to use them can help prevent future issues such as cracking or joint failure.
Paper tape
- Best for flat seams and inside corners
- No self-adhesion; requires use of a joint compound
- Resists stretching, ensuring long-term durability
Mesh tape
- Ideal for patching holes or repairing cracks, particularly in ceilings
- Self-adhesive but requires setting-type joint compound for proper bonding
- Cannot be applied using automatic finishing tools, as the required setting compound will jam the machine
For most drywall finishing projects, paper tape and a ready mix joint compound effectively conceal the joints, seams and interior corners where two drywall boards abut.
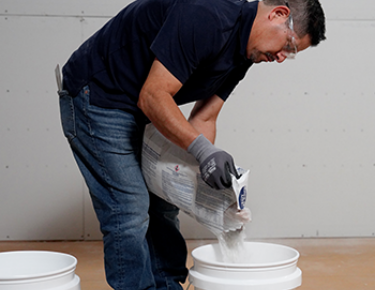
How to apply paper joint tape

Finishers can manually apply the paper tape and joint compound or choose to use automatic tools such as a bazooka or a banjo. For both scenarios, a key first step is ensuring the drywall is clean and free from dust or debris, which can prevent the tape from bonding properly.
For hand application:
1. Apply the first coat of compound
- Use a 4- to 6-inch taping knife to apply a smooth, even layer of joint compound over the seam.
- Be sure to extend the compound beyond the seam by a few inches.
2. Embed the tape
- Center the paper joint tape over the seam and press it into the compound using the knife.
- Remove any air bubbles by smoothing the tape with the knife.
- Avoid applying too much pressure, which can remove too much compound from underneath the tape and cause a starved joint.
3. Allow the coat to dry
- Before applying additional coats of joint compound, provide ample time for the first coat to dry.
Once the first coat and embedded paper tape have fully dried, apply a wider layer of joint compound over the tape, feathering the edges to blend with the drywall surface. Continue this step until the desired finish level is achieved. Then sand to remove imperfections.
Troubleshooting 3 common paper tape issues

1. Tape doesn’t stick
- Problem: The paper tape lifts away from the joint compound during application.
- Solution: Ensure the surface is clean and apply enough joint compound for adhesion. Then use a taping knife to embed the tape firmly.
2. Poor bond
- Problem: The paper tape doesn’t bond securely, causing cracks.
- Solution: Use fresh, quality compound and apply the correct amount — too little compound weakens the bond.
3. Blisters form under the tape
- Problem: Air pockets — often called blisters — appear under the paper tape.
- Solution: Smooth the tape thoroughly with the knife during embedding to eliminate air bubbles.
Finish fearlessly with ProForm Paper Tape
Crafted for unmatched flexibility and consistency, the ProForm family of products empowers finishers to master every project with flawless results and lasting spaces. ProForm Paper Tape delivers on this promise with a range of essential product benefits:
- Designed for use with ready mix or setting-type joint compounds and gypsum veneer plaster systems
- Center crease allows for easy folding for use at inside corners
- Buffed on both sides to ensure the best working qualities and bond
- Available in 75-, 250- and 500-foot rolls
ProForm provides an HPD for Paper Joint Tape, and the product is also UL GREENGUARD Gold Certified.
ProForm Paper Joint Tape is an essential tool for concealing and reinforcing joints on interior walls and ceilings. By selecting the right tape for the application and following best practices for embedding, finishers can achieve a seamless result that stands the test of time.
Ready to take your drywall finishing to the next level? Explore ProForm’s high-performance finishing products and find the perfect solution for your next project.
Be the first to hear of new NGConnects blog posts by subscribing here for early access.